How to Install Hardwood Floors | A DIY Guide
In this project tutorial I’ll walk you through how I installed the hardwood floor in my son’s bedroom and show you all the considerations and planning that needs to be done in order to do a DIY hardwood floor install.  In this case, we settled on a dark distressed bamboo hardwood. A common complaint with bamboo hardwood floors is that while they’re really resilient to dings and scratches once they’re installed, the tongues on them can be really brittle so installing them typically requires gluing them down rather than nailing them down which can be a little messy and challenging.
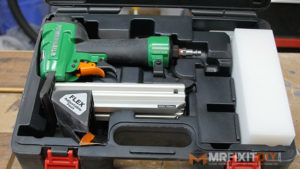 Fortunately, Powernail sent me their new Model 2000F 20GA. hardwood floor nailer to test out which they claim is specifically designed to install brittle tongued flooring. This nailer is much smaller than a traditional hardwood flooring nailer and doesn’t require a mallet to hit the nail gun and shoot the nails.
Things to Consider Before Buying Your Flooring
1. Determining Square Footage:
 Before you get started installing any hardwood or laminate flooring, you’ll first want to measure the room you’re going to be installing the flooring into and then checking the flooring you’re going to install to see what the square footage coverage is per box. Measure the length and width of the room and multiply them together. I recommend you purchase 10-15% more flooring than you need to account for cuts and waste.
2. Measure the Flooring in Adjoining Rooms
 Also, keep in mind the flooring in the adjoining rooms. You always want to try and choose a floor that is roughly the same thickness as whatever is around it so you don’t have a bunch of different height floors to try and dress up later. In my case, after removing the carpet I could get away with a hardwood that was 9/16” thick to keep an even height with the hallway. You don’t want to choose a floor that’s too thick or too thin that you have to try and come up with a fix for later.
Purchase Your Flooring and Acclimate it to Your Home
 Once you have your flooring, bring it into the house or the area it’s going to be installed and let it acclimate to the climate in the room for a few days. The humidity of your home can affect the flooring so you never want to install it the same day you purchase it.
Preparing the Subfloor & Remove Baseboards
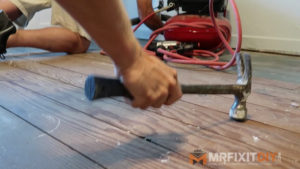
Next you need to prepare the subfloor that the hardwood is being installed over. In this case I removed some old carpet and found old tongue and groove subfloor underneath. Check the floor to make sure it’s nice and level and do any necessary work level the subfloor if you have to.Go around and knock down any old nail heads, or remove any staples or things sticking up from the floor, and then thoroughly clean the area with a shop vac.
Also, remove any existing baseboard moldings in the room. In this case the baseboards are old built in baseboards that are plastered in with the walls which I won’t remove because it would damage the walls so I’ll custom make some new baseboards to go over them later.
Laying Out Your Flooring
 Next you want to determine the layout of the flooring in the space. I like to start by finding the longest straight run in the room, (or work off the center of the room if it’s relatively square). Working my way off that point, I lay out some pieces or measure the width of my finish boards to determine where they’ll line up. I do this to make sure that I won’t have any sliver cuts or funky shaped pieces to deal with during installation.

Keep in mind that many old homes have walls that are out of square so adjust your measurements accordingly. If you find you’ll have an awkward cut piece, adjust where your pieces will line up so you don’t have any really thin pieces are the end to deal with. Also try and determine what layout will

allow you to cut the fewest pieces. Make sure you plan to stagger each joint by at least 6” and avoid H joints where 2 rows line up that aren’t at least 2 rows apart.
Underlayment
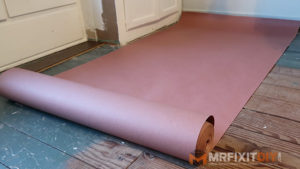 Once you have your layout roughly figured out, next install a vapor barrier on the floor. Red Rosin paper is a cheap product that’s been around forever, but they also make a ton of other products for this. Lay it out in the room and overlap it by 4-6” with every row.
Installing the Flooring
 Now you’re ready to start installing your flooring. On your first rows, you may need to face nail the rows in place with a finish nailer to hold them in place. Make sure you leave an expansion gap around the edges of the flooring at each wall. This allows for the flooring to expand and contract with changes in season and humidity. Follow any markings you laid out on the floor during the layout phase to make sure you’re laying the flooring correctly.
 Once you have the first few rows installed, you can use the flooring nailer from here on out. I like to use a small piece of the actual flooring as a tap block to make sure the pieces are firmly seated in their grooves before shooting them in place. They sell tap blocks and bars but I find using the actual floor works better and doesn’t slip as much so there’s less chance of damaging the edges of the flooring. When nailed, this flooring recommends being fastened every 4-6” so I’m working my way down each piece.
Alternate Pieces from Different Boxes of Flooring
Colors can vary from box to box so as you work your way through the room, make sure you’re taking pieces from various boxes of flooring as you go. You never want to do half your room and then find out that the next box is a slightly different shade.
Door Jambs
 When you get to door jambs, use a piece of flooring to act as a depth gauge to cut off the bottom of the casings at the height of the new flooring and then slide the new flooring underneath. Don’t try to cut the flooring around them because it looks terrible. Also, extend the flooring into the center of the jambs and then later you can go back and install a transition or threshold piece to blend the floors from various rooms together.
Face Nail the Final Row
 Work your way through the entire room and when you get to the final row, face nail it in place as close to the wall as you can. You can patch any face nail holes with matching wood putty, or cover them with the baseboard or shoe moulding that you choose. A finish nail shouldn’t be noticeable in the flooring.
Install Floor Transitions or Thresholds
 Lastly install any transition or threshold pieces. These may be additional items you need to purchase as part of your flooring order. Talk to your hardwood flooring retailer and let them know what types of transitions you need. Now you can install whatever baseboard or shoe moulding you choose and you are finished with this project!
Finished!
 I hope this tutorial was helpful in teaching you how to install hardwood floors. It can be a little tricky, but I’m confident you can do it on your own and get great results like I did. If you liked this project, here are a few other home improvement projects you might enjoy!


 Contractor at Age 40!")
")

[…] Info on Installing Hardwood floors: https://mrfixitdiy.com/install-hardwood-floors/ SUBSCRIBE: http://bit.ly/1HmTBBx In this DIY project tutorial I show […]
[…] Info on Installing Hardwood floors: https://mrfixitdiy.com/install-hardwood-floors/ SUBSCRIBE: http://bit.ly/1HmTBBx In this DIY project tutorial I show […]
[…] How to Install Hardwood Floors […]
Comments are closed.