This week I decided to change it up a little bit and show you guys my Top 5 Home Improvement Hacks for saving time and/or money around the house. These are all simple things you can do around your house! Check out the video above, and then let’s go into the details.
#5.) SAVE WATER IN THE BATHROOM

Here in Southern California, water is a premium especially given the recent drought. Water rates continue to rise and can add up quickly! The average home uses 45% of water in the bathroom with 27% going towards the toilet. Water efficient toilets can still use up to 1.6 gallons per flush.
HACK THE TOILET – Fill up a 1 liter bottle with water and place it inside the back of the tank. The tank will need about 1 less liter to fill up each time saving around 1 liter per flush. It doesn’t have to be a bottle, you could really use just about anything that takes up a decent amount of volume in the tank, just make sure it doesn’t interfere with the mechanism of the toilet itself and still provides enough water to flush the toilet. You could use a brick if you really wanted to!
GREYWATER BUCKET – Another water saving tip is to use a grey water bucket in the shower. I typically keep a bucket in the shower with me, and I know it may not seem all that glamorous to most people but capturing the runoff from your shower and using it to irrigate your plants around the home can add up to a substantial water savings over time!
#4.) SPEED SQUARE TIPS

A speed square is a super valuable tool in your tool arsenal. It can be used for a TON of things, but did you know you can use it to draw a circle in a pinch? It may seem odd to use a triangle shaped tool to make a circle, but it’s easier than you think! ost speed squares have a little notch in the corner that allow you to mark a quick and easy circle. Place a finish nail or something as your center point, place the notch of the speed square around it, and use a pencil to mark your radius and boom! Circle done.
Here’s another use for a speed square. Let’s say you’re working around the house and you either don’t have a chop saw or don’t have one nearby to make square cuts in your lumber. No problem! Use a speed square to act as a saw guide to cut a perfect 90 degree angle.
#3.) MAGNETIZING YOUR TOOLS

Magnetic tip screwdriver sets are great to have around the shop when you need them, but the coating on the end can be a little fragile at times. Personally, there are few things I find more frustrating than trying to work on something and the tiny screw keeps falling off the screwdriver. You can easily and quickly solve this issue by magnetizing the screwdriver. Grab the screwdriver and a magnet (I use the magnet on the bottom of this Tekton magnetic parts tray) and drag the screwdriver over the magnet in one direction, rotating the screwdriver a little bit with each pass. Now you’ve got yourself a magnetized screwdriver that will hold onto that troublesome screw. You can also now use the screwdriver to pick up small metal objects in hard to reach places.
#2.) WRAP YOUR EXTENSION CORDS LIKE A PRO
Extension cords are essential around the house for DIY projects, lawn decorations, etc. but if you’ve been wrapping and storing them by tightly wrapping them around your upper arm, or in one of those plastic orange cord wranglers, you’re doing it wrong and shortening the life of your extension cord. Not only that but you’re probably regularly having to untangle the cord. The proper way to wrap the cords is called the over/under technique and it’ll save you a headache next time you go to use it and save you money by extending the life of the cord.

Start by holding the female end in one hand and using the other, create a loop up and over as shown above. Now with the next loop you create, you’re actually going to flip your wrist under bringing the cord Under. (See image below and watch the video to see it in action)
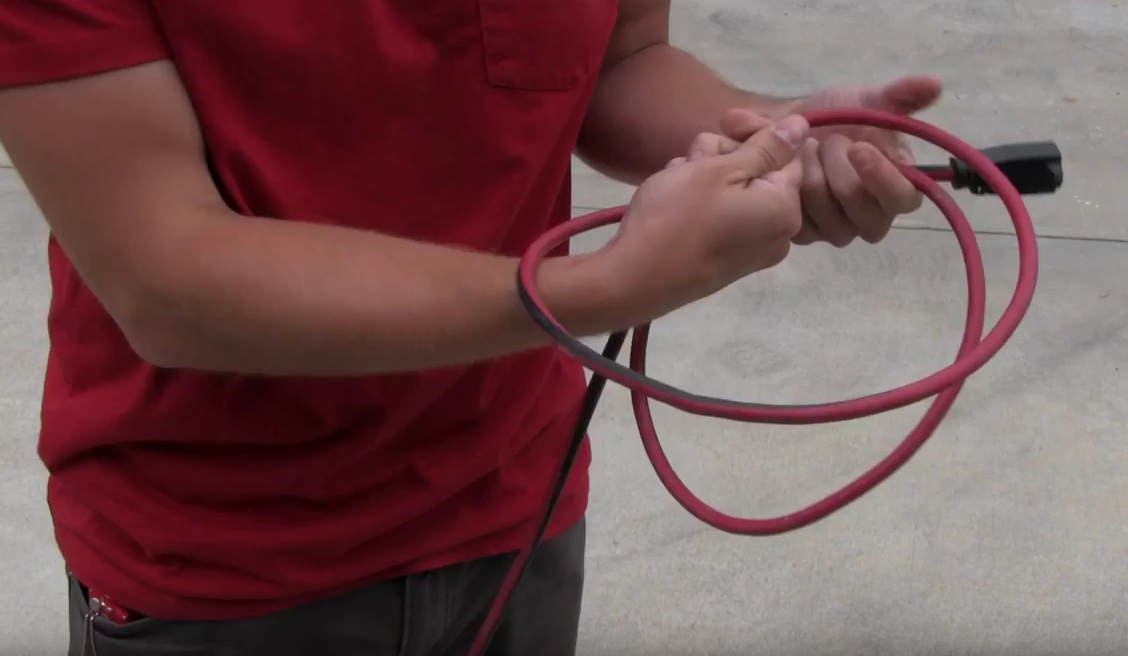
The “UNDER” Part of the cord wrap.
Once you have your first two loops, you continue with the over/under, alternating each wrap until you reach the end of the cord. Once you have it all wrapped up, it’ll be nice and coiled and you can easily unwind it without tangles next time you go to use it!
In addition, when using your extension cords with power tools, tie a knot in the cord to prevent it from coming unplugged or creating stress on the prongs that could bend them.
#1.) USE A REFRIGERATOR MAGNET TO FIND A STUD

Let’s say you want to hang something on the wall but you don’t know where a stud is. You can try to knock on the wall, measure every 16” or even use a stud finder and you still might miss one. BUT did you know you can use a refrigerator magnet to find one super easy? Grab a magnet off the fridge and use a piece of painters tape to make a little handle for it. Drag it across the area of the wall you want to hang your picture or shelf and the magnet will find the metal fasteners used to attach the drywall or plasterboard. Once you find a fastener you can use a level to mark a vertical line if you need to install something lengthwise or you can use a piece of string with a weight on it attached to the magnet. To mark the next stud over, mark your first position and then use your magnet to find the next stud. Use a level to connect the two if need be.
So there you have it. Hopefully these tips will help you out around your house or during your next home improvement project.
Thanks for checking out this post and video now get to work!


