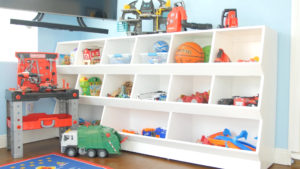
DIY Giant Toy Box
If you have kids, you know how quickly toys can pile up and completely make a mess of your home. Having a toy box for them and keeping them organized is a huge part of keeping your sanity.
Today I’m going to show you how I built this toy box utilizing the new lineup of Craftsman V20 tools. Craftsman is the official sponsor of this project so thank you to Craftsman for making this project possible. So without further ado, let’s dive into the project!
Disclosure: This video and article contains paid and product promotion by Craftsman. Check out their new line of V20 tools here: https://bit.ly/2DoDfAD
#1: Plan Out Your Design
This toy box is huge! It’s 90” long by 42” tall and serves a multitude of functions. Obviously it holds a lot of toys, but it also acts as a complete entertainment center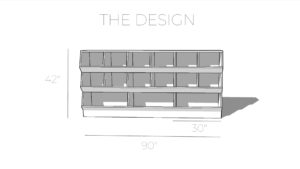
I made my plans in Sketchup, and if you’d like to follow along with this project step-by-step, there are free downloadable plans for it on my website. While you’re at it, check out some of the links to some of the other free project plans I have too!
#2: Create a Template
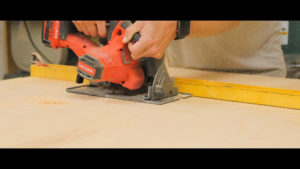 First, I created a template for the uprights of the toy box. This project is basically the same shape repeated over and over, so I needed a good template. I used a piece of MDF to measure and layout the shape I wanted. Then, I cut the shape out using the Craftsman V20 jigsaw. I used a straight edge as a guide to keep the lines nice and clean.
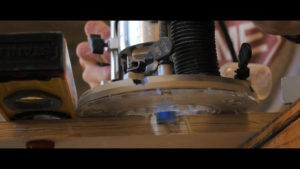
 Taking a piece of ¾” paint grade plywood, I cut a similar shape slightly larger with the jigsaw. I used a flush trim router bit on my Craftsman router, following the template to create 1 finished panel. Then I just had to repeat this process 6 more times. It takes a little while but the template makes it easily repeatable.
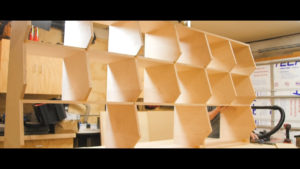
#3: Interlocking the Pieces
 Once all 6 were cut out, I ripped a piece of plywood to serve as the top and bottom. From there, it was all about dados. And I mean a lot of dados. I chose to use dados because it gives a lot of strength to the build, because each piece interlocks and supports the whole. It adds quite a bit to the workload, but if kids are going to be climbing on it or playing near it, it needs to be sturdy. If I did this project again, I would probably use 1/2″ plywood instead of ¾” because it got to be pretty heavy by the end.
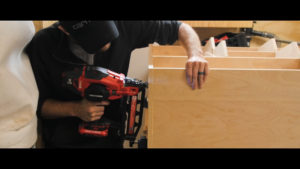
Once the pieces were all in place, I took it apart bit by bit and glued it up and shot it together with the 16 gauge Craftsman V20 brad nailer.
#4: Assembly
 Once I finally had the whole carcass put together, I could put the front face frames on. The design is laid out so that each piece can be mitered at 45 degrees to make it easy and repeatable on the table saw. I glued and fastened these in place with brad nails. Once that was finished I added some iron on edge banding to cover up the exposed edges of the plywood. This helps clean up the edges and make it easy for the paint to look uniform without having to add a bunch of coats. Then I could patch the brad holes with some wood filler and prep it for paint.
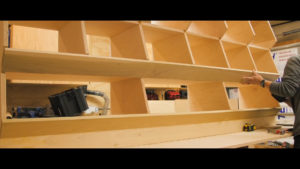
I also added some adjustable leveling feet to the bottom of the toy box. I glued some 2” wood blocks in the corners and added a threaded insert. Then I used my angle grinder to slice a line in the end of a carriage bolt. This allows you to use a flathead screwdriver to raise or lower the toy box to make it level.
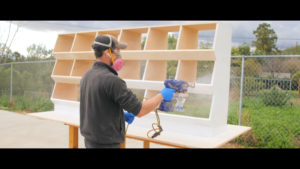 Lastly, I sprayed several coats of wood sealing primer with my paint sprayer before spraying a couple coats of exterior semi-gloss white to finish it off. I chose exterior because I figured it’d be a little more durable than interior. I also added a thin piece of ¼” plywood on the back to finish off the piece.
I’m really happy with the way this toy box came out. Hopefully you enjoyed this project, and if you’d like more detailed measurements and step-by-step instructions on how to build your own, be sure to download the free plans on my website.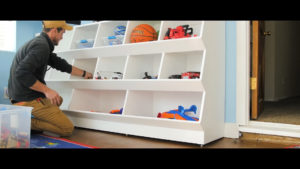
I want to say thank you to Craftsman for sponsoring this project and providing the V20 lineup of tools I used in this video. And as always I encourage you to leave me a comment down below and let me know what you thought of the project and what type of project you’d like to see me tackle next.
Thanks so much for checking out this project. I hope you enjoyed it! If you did like it, you might also enjoy some of these other free downloadable project plans.
")
")


 Contractor at Age 40!")
")
