Nothing rings in the Holiday Season like sitting around a roaring fireplace sipping some hot chocolate. If you haven’t already, now is the perfect time to clean your chimney before Santa Claus comes sliding down and tramples soot around your home. Today I’m going to show you how to clean your chimney and why you should.
 Regularly cleaning your chimney is an important part of keeping your home safe for the winter months. That’s because as you use your fireplace to burn wood for warmth (or just for seasonal atmosphere), a highly flammable carbon based, tar-like substance called creosote begins to build up on the inside of your chimney walls. Over time, this build up can ignite and burn at over 2000° Fahrenheit which can be extremely difficult to extinguish and quickly spread to other areas of your home.
In fact, on average there are over 25,000 of these chimney fires every year that lead to over $125 million in property damage. (According to the Chimney Safety Institute of America)
Fortunately, cleaning your chimney isn’t a super challenging task and is something most homeowners can tackle on their own if they choose to. So today I’m going to show you how you can do it. You should add this to your to-do checklist every fall to make sure that your home is ready for the winter.
The Right Tools

The first thing you’ll need to do is purchase a simple chimney sweeping brush online or at a hardware store. There are a ton of different options available in various sizes so you may want to go on your roof and measure the diameter of your chimney liner to make sure you buy one that fits. I bought one that attaches to the end of a drill on Amazon for about $60. I’ve made a list of all the tools you may need to tackle this project.
Seal Off the Fireplace
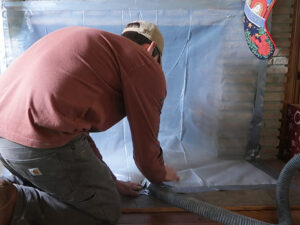
Next you’ll want to use some plastic and tape to tape off the fireplace area or make sure your wood stove is closed and sealed tightly. The cleaning process creates a lot of loose soot and you don’t want all that flying around your house. I recommend using a 4-6 mil plastic and some duct tape to seal off the area thoroughly.
I also like to place a shop vac hose into the sealed off area so that any loose chimney dust that falls into the fireplace can get sucked up. It’s not a perfect system but it helps keep chimney dust out of your home.
Access the Roof
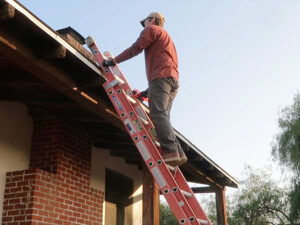 From there you’ll need to get up on your roof so make sure you can do that safely with a sturdy ladder. It becomes a little more challenging for steeper pitched roofs so make sure you take the necessary safety precautions so that you can access the chimney safely. Depending on the height of your chimney stack, you may need an additional ladder or step stool to get to the top.
 Once you’re up on the roof, remove the chimney cap. It’s usually just a few screws holding it in place. If you don’t have a chimney cap in place, you should definitely purchase one. Not only do they prevent birds and other animals from nesting, or climbing down the liner but they also keep other debris like leaves and branches out of your chimney. To my knowledge they’re also now required during a home inspection so if you ever plan to sell your home you’ll need to have one installed. They’re not very expensive online. Most are adjustable within different size ranges. You can just measure your chimney liner and buy one in the size range that fits.
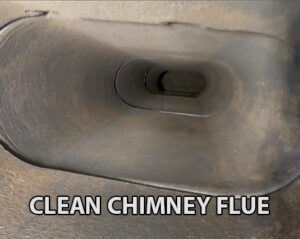
Inspect Your Chimney Liner
 Next you’ll want to use a flashlight to shine down the chimney and see what you’re dealing with. If you have a GoPro or action camera you can also send that down the chimney to see any visible obstructions and inspect the condition of the chimney. In my case it looks pretty good, just needs to be cleaned.
Assemble Chimney Brush & Clean the Chimney
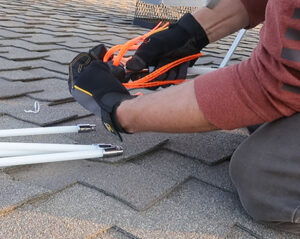 From there attach the fiberglass rods to each other and begin to feed them down the chimney. Make sure you have a good respirator, safety glasses, and gloves on hand. If you have one that attaches to a drill like this one, once you’ve fed the rods down the chimney and you’ve reached the length of your chimney liner, attach the other end to the drill.
 I like to start at the bottom and work my way up the chimney, but it doesn’t really matter how you do it. Just work your way through the entire liner, and make sure you clean it thoroughly. Once you think you have it nice and clean, use your flashlight or camera to make sure it all looks good.
Once your chimney flue (liner) is all cleaned, replace your chimney cap and you’re good on the roof. From there, find your chimney clean out which is usually on the backside of your fireplace or chimney and use a shovel or shop vac to remove all the debris that has fallen.
Clean the Firebox
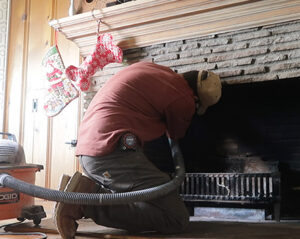 After you’ve allowed all the dust to settle, you can remove the plastic on the inside of the house and clean the inside of the fireplace as well.
And that’s it, you’re good to enjoy many warm fires in your fireplace or wood stove for the winter months!
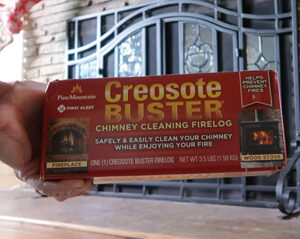 It doesn’t hurt to burn one of these creosote busting logs in your fireplace every once in a while. They’re designed to help keep creosote from building up, but they should never be used as a replacement for a good chimney cleaning. You can use them if you want to but you also need to clean the chimney every year.
Update Your Fireplace with a Gas Firelog Set
If you have a gas starter on your fireplace and don’t want to deal with the hassle of a wood fire every year, you can also replace your wood burning fireplace with either a gas fireplace insert OR a gas fire log set. These log sets are a little expensive, but use either natural gas or propane to create a clean burning fire without the hassle of creating a lot of ash and soot.
So that’s it for this project! I hope you enjoyed it and I hope it helped you get your fireplace ready for the long winter ahead. If you enjoyed this project, here are some other Winter DIY projects to keep your home warm all winter long!
https://mrfixitdiy.com/winter-is-coming-is-your-house-ready/


 Contractor at Age 40!")
")
